You picked out and configured your Fiat 500X just the way you wanted and brought it home thinking you are done personalizing it. Well, not so fast! Mopar, the parts, and accessories division of FCA offers more than 100 accessories to customize your car further. Owning a Fiat, after all, is about fun, style and driving something the opposite ordinary.
With that in mind, we looked through the Mopar online catalog to see how we can spice up our faithful 500X we purchased a few years back. Our Bianco 500X Trekking has a black interior with red accents, so we decided on a few tasteful exterior accessories that picked up on the red interior accents. As we like to encourage people to try their hand at personalizing their car, Mopar obliged and sent us the following accessories.
- 500X Red Body Side Moldings, Part Number: 68263342AA, Suggested Retail: $260
- 500X Red Mirror Covers, Part Number: 68280278AA, Suggested Retail: $105
- 500X Bodyside Graphics, Part Number: 82214955, Suggested Retail: $165
All these items are available for purchase at your local dealer or online on the Mopar website and can be installed by a do-it-yourselfer who has some patience. An important thing to remember about Mopar accessories is they have the same fit and finish as factory parts and carry a 24 month/unlimited mileage guarantee.* They function and fit like OEM parts because they undergo the same testing as the parts on your car. These aren't knockoffs and are the real deal.
The object of this Fiat How-To article will be to go over how we installed these accessories and to offer our insights and tips. Because there are several items, we will post three separate articles in the interest of space and go into greater detail. Don't forget to follow the link to the forum to ask questions.
Installing The Fiat 500X
Mopar Body Side Molding Kit
The Fiat 500X features a lower body side moulding with a spear-shaped accent. To show off this shape, Mopar offers a variety of different colors to personalize your 500X. We chose a red accent to go with the red accents in the interior.
Installation difficulty rated on a scale of 1 thru 5 would be a solid 1 or maybe a 2 if you are new to using adhesive tape. Figure an hour or so to complete this job. As with anything attached to a car with adhesives, you need to make sure the surface is clean, and the temperature is within the range specified in the instructions - in this case 65° F / 18° C. Hold off attempting this if the location you are working at is too cold or you will have issues down the road with the adhesive failing.
Here is what you will need: Silicone Adhesive, Grease and Wax Remover, Lint Free Towels, Gloves and the supplied adhesion enhancer. There is an additional adhesion promoter/plastic primer that is listed in the instructions, but I've had good luck with the above silicone adhesive and elected not to use it. Your mileage may vary so consult a body shop if you have any concerns about not using it.
To mount the mouldings you'll need to augment the attached 3M double sided moulding tape with silicone adhesive. As mentioned above, you must clean the mounting surface completely. However, the the instructions recommend against using the usual alcohol to do this and specifies a solvent based grease and wax remover.
This is the silicone adhesive that was used to augment the double sided moulding tape.
After you assemble your supplies, you need to test fit the mouldings. You'll find they fit perfectly. Do the test fit and get familiar with how they fit on the edges because you don't want to reposition the mouldings once you set them down.
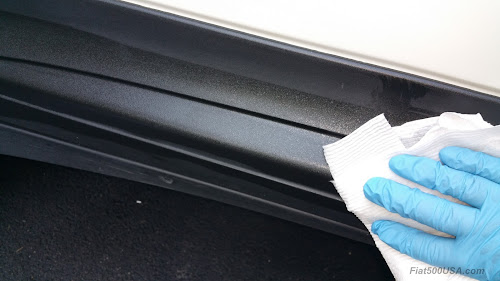
After the test fit, clean your mouldings. You must remove all vestiges of dirt, oil, protectants or dressings. Follow the directions on your wax and oil remover. I use lint free, white paper towels so I can check for discoloration indicating there is still surface contamination. Don't rush this step.
The moulding comes with 3m double sided tape attached to it. When applying tape to plastic, an adhesion promoter is recommended and Mopar includes it with the moulding kit.
Using the supplied sponge, apply the adhesive promoter all around where the double sided tape will sit. There is a working time between 90 seconds and one hour with this product so plan accordingly.
Clean the moulding with of all dirt and grease with the degreaser. Let it evaporate before going onto the next step.
Grab your tube of silicon adhesive and...
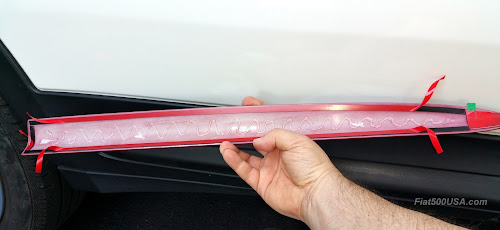
... apply it to the moulding. This was the pattern illustrated in the instructions. While I could have made the beads a little wider, it is important not to get the silicone too close to the tape where it can contaminate it.
Peel back an inch or so of the tape backing on each corner.
The right rear moulding just before install. The tape backing on the front of the moulding was also peeled back, You want to have just enough tape backing hanging out so you can get a good grip on it when you pull it off.
Align the moulding at the front, back and top, double check and then push it on lightly. Check again and then hold it down while you carefully pull the tape backing off from all around the moulding. Once the tape is removed firmly press the mouldings on evenly all over. Hold this pressure for one minute.
I used a microfiber towel to press the moulding down so as not to scratch the surface with my fingers.
The mouldings fit beautifully, so as long as you took your time test fitting and applying them you'll have no issues.
Some extra color accents this neat design feature.
---------------------------
Our next article in this series will be how to install Mopar Mirror Covers on a 500X. After that we will tackle the body side stripe. Stick around!
Links:
*Contact your dealer or check the Mopar website for warranty details.
Disclaimer: This is how I installed the lower body side mouldings on my Fiat 500X and is provided for informational and entertainment purposes. If you have any doubts on you ability to perform this work or have any issues, I recommend having it done by a professional. I am not responsible for any issues arriving from you reading this post. Use at your own risk.
Come installare Fiat 500X Finiture Laterali.


Comments
Post a Comment
Comments are welcome, but do not forget to visit the Fiat 500 USA Forum for lively discussions on this post: www.fiat500usaforum.com