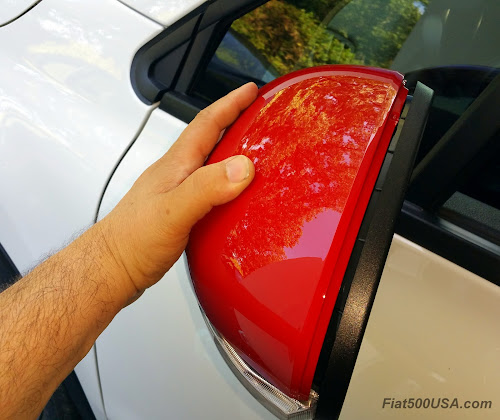
This article is the second part in a series of posts where we show how we installed several Mopar accessories onto our Fiat 500X. The subject of today's story is installing 500X Mopar mirror covers that can be purchased at your Fiat dealer or online on the Mopar website.
Read part one here:
Mopar is the parts and accessories division of FCA and has an extensive catalog of accessories to customize your Fiat. From mild to wild, Mopar has something for you. Some of the benefits of using Mopar accessories is their testing of the products to original equipment standards, their excellent fit and finish, plus long warranty.*
We chose several Mopar accessories to customize and accent some of the design features of our car. The Euro-chic Fiat 500X can be configured in numerous ways, from sophisticated urban cruiser to athletic offroader. The accessories we picked complement the sporty look of our 500X Trekking:
- 500X Red Body Side Moldings, Part Number: 68263342AA, Suggested Retail: $260
- 500X Red Mirror Covers, Part Number: 68280278AA, Suggested Retail: $105
- 500X Bodyside Graphics, Part Number: 82214955, Suggested Retail: $165
Below we offer our insights and tips on how we installed the Mopar Mirror Covers onto our 500X. Make sure you visit the Fiat 500X DIY forum to ask questions.
Installing Fiat 500X Mopar Mirror Covers
FIAT 500X Red Hypnotique Mirror Caps, Part Number: 68280278AA
Installing the Fiat 500X Mirror Covers isn't difficult, but can be a little tedious if you don't want to break any clips if you intend to reuse the old covers. Installation difficulty rated on a scale of 1 thru 5 would be a 2 and a half.
This is the kind of operation you probably need to do a few times to get good at. The main issue is you cannot see the clips and there is some prying needed to snap the covers off. I'll show you where and how I got mine off. My covers can be reused but there was a secondary locating tab that broke off on one of them. As there are numerous clips and tabs, the missing one wouldn't prevent me from reusing the cover if I desired. **
This is what you get in the box. Two covers and installation instructions. Being a Mopar accessory, the mirror covers offer original equipment quality and fit.
You can tell the covers are authentic because the installation sheet is in Italian with a shaky English translation! They are basic and mention using a special Mopar trim tool and the location of the main clips that hold the mirror on.
The tool number is FIAT 1878077000 or in NAFTA corresponds to Mopar C-4755. It is a thin trim stick used for prying off trim. The above tool is a similar design and can be found at any auto parts store.
Here is the back side of the new mirror cover. This is the passenger side (right hand) cover. Note the 4 major attachment clips marked in red and the locating tabs marked in yellow and how they correspond to their location on the mirror housing below.
The Fiat 500X passenger side mirror assembly without the mirror cover attached. The red arrows are the location of where the attachment clips go that hold the mirror cover on and the yellow arrows are where the locating tab slots are. Refer to this picture when you are prying the cover off.
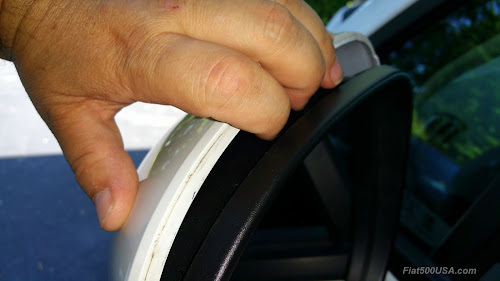
I started on the top inside portion of the mirror cover that faces the window. On the passenger side I was able to pull the cover away from the mirror housing with my fingers due to the cover being previously damaged. On the driver's side, you will see I used an old credit card/hotel key to pry the cover off of the mirror housing.
Another shot of the passenger mirror cover coming off. Note the cutout that allows you to use a thin trim stick or plastic card to pry the cover away from the mirror housing.
Looking inside the mirror assembly, this is the bottom attachment clip holding the mirror cover to the mirror housing.
The 500X mirror housing with the cover off. Unlike Fiat 500 hatch and Cabrio models, you cannot access the attachment clips by removing the mirror glass.
Note the location of the bottom attachment point that holds the cover on. It is at the beginning of the mirror assembly's built in turn signal. There is a beveled edge on the mirror cover that will allow you to stick a thin trim stick or other object into the opening so you can release the clip.
Here I'm working on the driver's side mirror. Starting at the upper corner facing the window, I use a handy Fiat USA e-store card to wedge in and pry the cover away from the housing.
I ran the card down the cover on the side of where the drivers front door glass is. This will give me a small space at the bottom corner so I can use my fingers to pull the cover away from the housing.
The yellow dot marks the approximate location of a locating tab. I worked my fingers in and pulled on the cover straight towards the window to remove the locating tab out of its receptacle. Refer to the housing picture above with the yellow and red arrows. Remember the yellow marks are locating tabs the just fit into a hole. The red marks are attachment clips that have to be disengaged either by prying with a trim stick or by pulling up on the mirror cover with a tug.
Working my way around the front, release the locating tab on the left side of the picture designated by the yellow dot. Note the red dot above where my fourth finger is. That is approximately where the bottom attachment clip is that holds the mirror cover on. The mirror cover has a beveled edge in that location that allows you to get in there with a thin trim stick device to release the clip. Releasing this clip now will make the rest of the operation easier.
Once most of the mirror cover was lose I went back to the top, working my fingers in and gave the mirror cover a tug and unhooked the top part of the cover.
These are the location of the two upper attachment clips that I just disengaged. Note: If you are having difficulty pulling the top of the cover off, try releasing the second bottom attachment clip shown below and then go back to working on the top.
Using an old hotel key/card I pried the lower part of the cover off. I layed down some tape to protect the finish of the mirror housing/turn signal lens and old cover. The red dot marks the approximate location of the second bottom attachment clip. The yellow dots are the locating tabs. Carefully so you don't damage the turn signal lens, push a thin trim stick or card up until you can push the attachment clip up and disengage it from the housing, To get more room, you may need pry on the cover near the yellow locating tab on the left in the picture.
A couple of shots of the mirror cover coming off.
I took the mirror off from the top. The hard part is done!
Putting the mirror covers on is easy. Place the mirror onto the housing assembly, aligning the locating tabs.
Because the Mopar mirror cover is an original equipment piece the fit is perfect.
Firmly push the mirror cover onto the housing. Because of the fit, the cover should snap on easily.
Take your hand and go all around the cover to make sure there are no gaps between the cover and the mirror housing. That's it!
Admire the new look your car has.
===========
Next up in this series of articles will be installing the Fiat 500X Lower Body Side Stripe. You do not want to miss that!
Part 3 is out! Fiat 500X Side Stripe Install
*Contact your dealer or check the Mopar website for warranty details.
Disclaimer: This is how I installed the mirror caps on my Fiat 500X and is provided for informational and entertainment purposes. If you have any doubts on you ability to perform this work or have any issues, I recommend having it done by a professional. I am not responsible for any issues arriving from you reading this post. Use at your own risk.
**Update:
Here is an alternate way a reader posted that may be easier. Thanks for the tip!
"Fred said...
First of all, thank you very much for posting these instructions, the photos and the details are very useful. That said, here's a tip of someone who just used your instructions to go a different way: Start at the bottom.
Just go there and push with your fingers a little bit and you'll notice there's a 'soft spot' that you won't find in any other part of the cover. Once you push on the spot and then pull the cover from that bottom [center] clip, you can start working your way up, balancing the work between left and right. It's faster and I did it without breaking any of the clips, not even the small one at the corner."
Come installare gusci calotte specchietti Fiat 500X
Mirror covers provided courtesy of Mopar


First of all, thank you very much for posting these instructions, the photos and the details are very useful. That said, here's a tip of someone who just used your instructions to go a different way: Start at the bottom.
ReplyDeleteJust go there and push with your fingers a little bit and you'll notice there's a 'soft spot' that you won't find in any other part of the cover. Once you push on the spot and then pull the cover from that bottom [center] clip, you can start working your way up, balancing the work between left and right. It's faster and I did it without breaking any of the clips, not even the small one at the corner.